
Assignment One - Add On

Charging station for Rode Wireless Go - Microphone
-
I place great importance on producing high-quality videos that captivate and engage with my audience. A critical component in achieving this goal is ensuring that the audio quality of my recordings is top-notch. For this reason, I rely on the Rode Wireless Go microphone, which has proven to be a game-changer in terms of audio clarity and consistency.
However, as much as I value the performance of this microphone, the process of charging it after each filming session can be quite a hassle!
To solve this issue, I created a charging station specifically for the microphone, providing a dedicated charging space and eliminating the need for multiple cables. Since using this station, I have noticed a significant improvement in productivity and satisfaction with the charging process.
-
Materials:
First Prototype: Cardboard and DuckTape
Second Prototype: 3D Printed PLA
Final Version: 3D Printed PLA


Step 1 - Measurements And Sketches
-
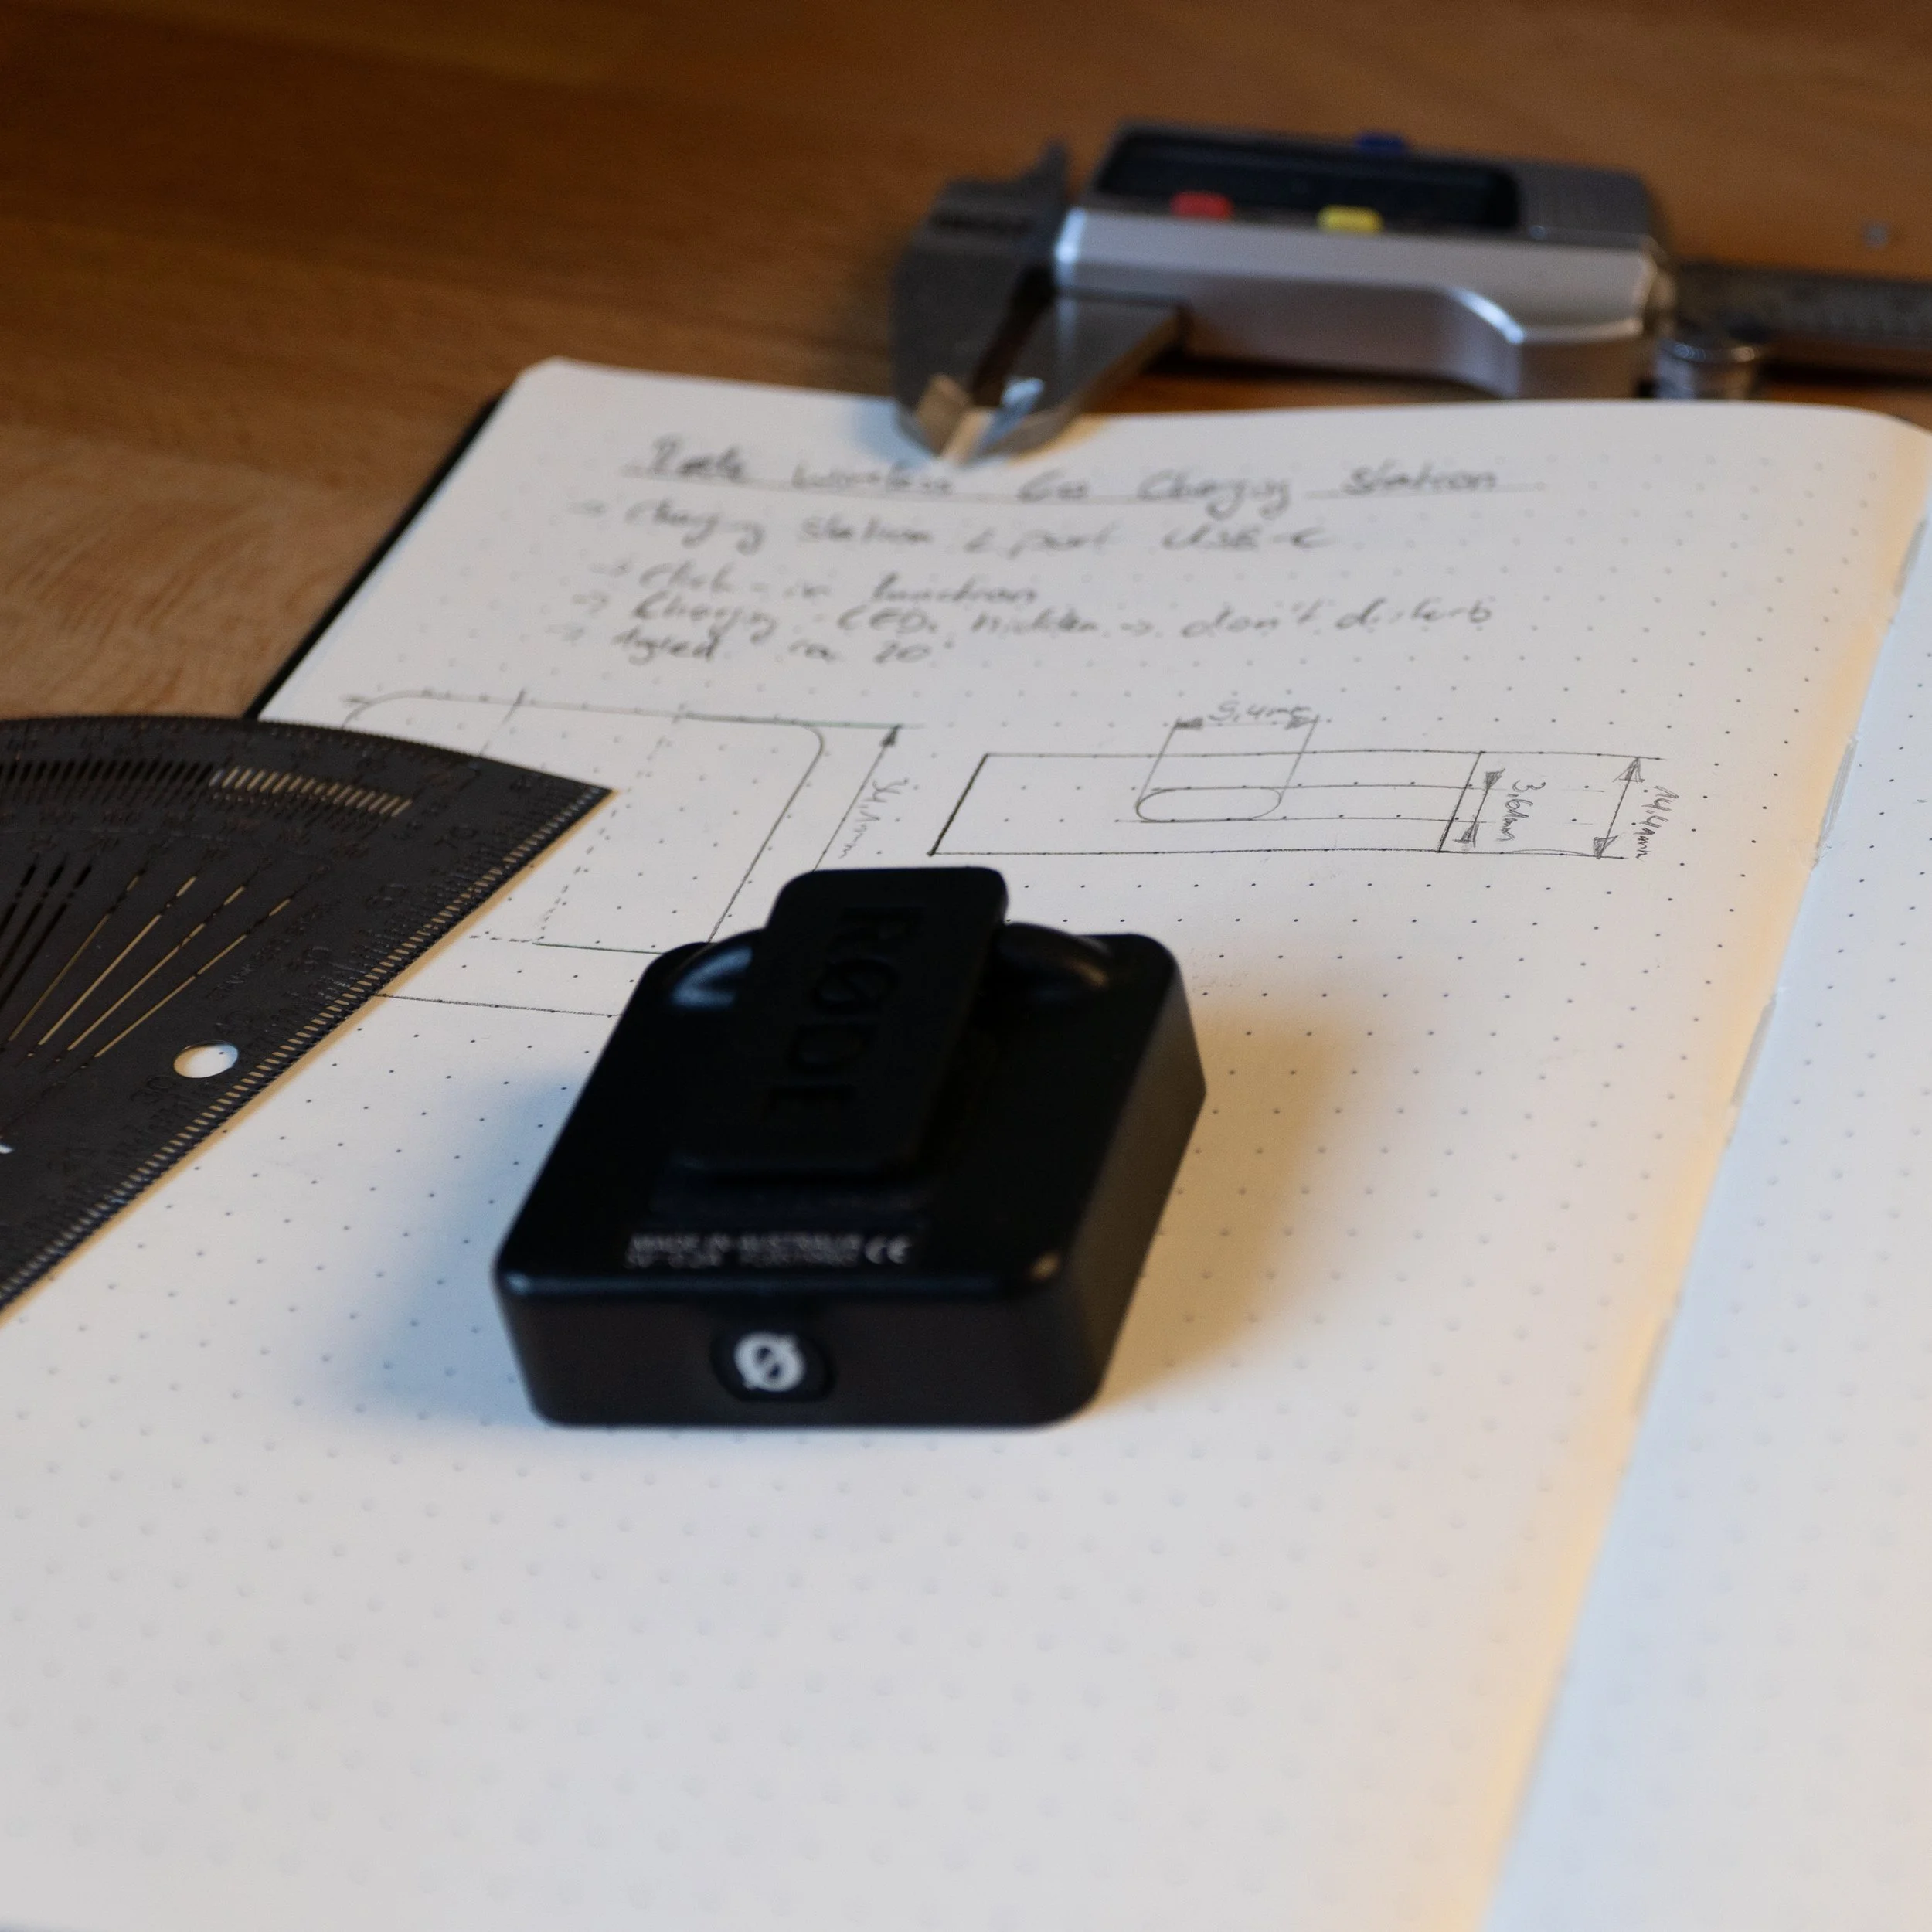
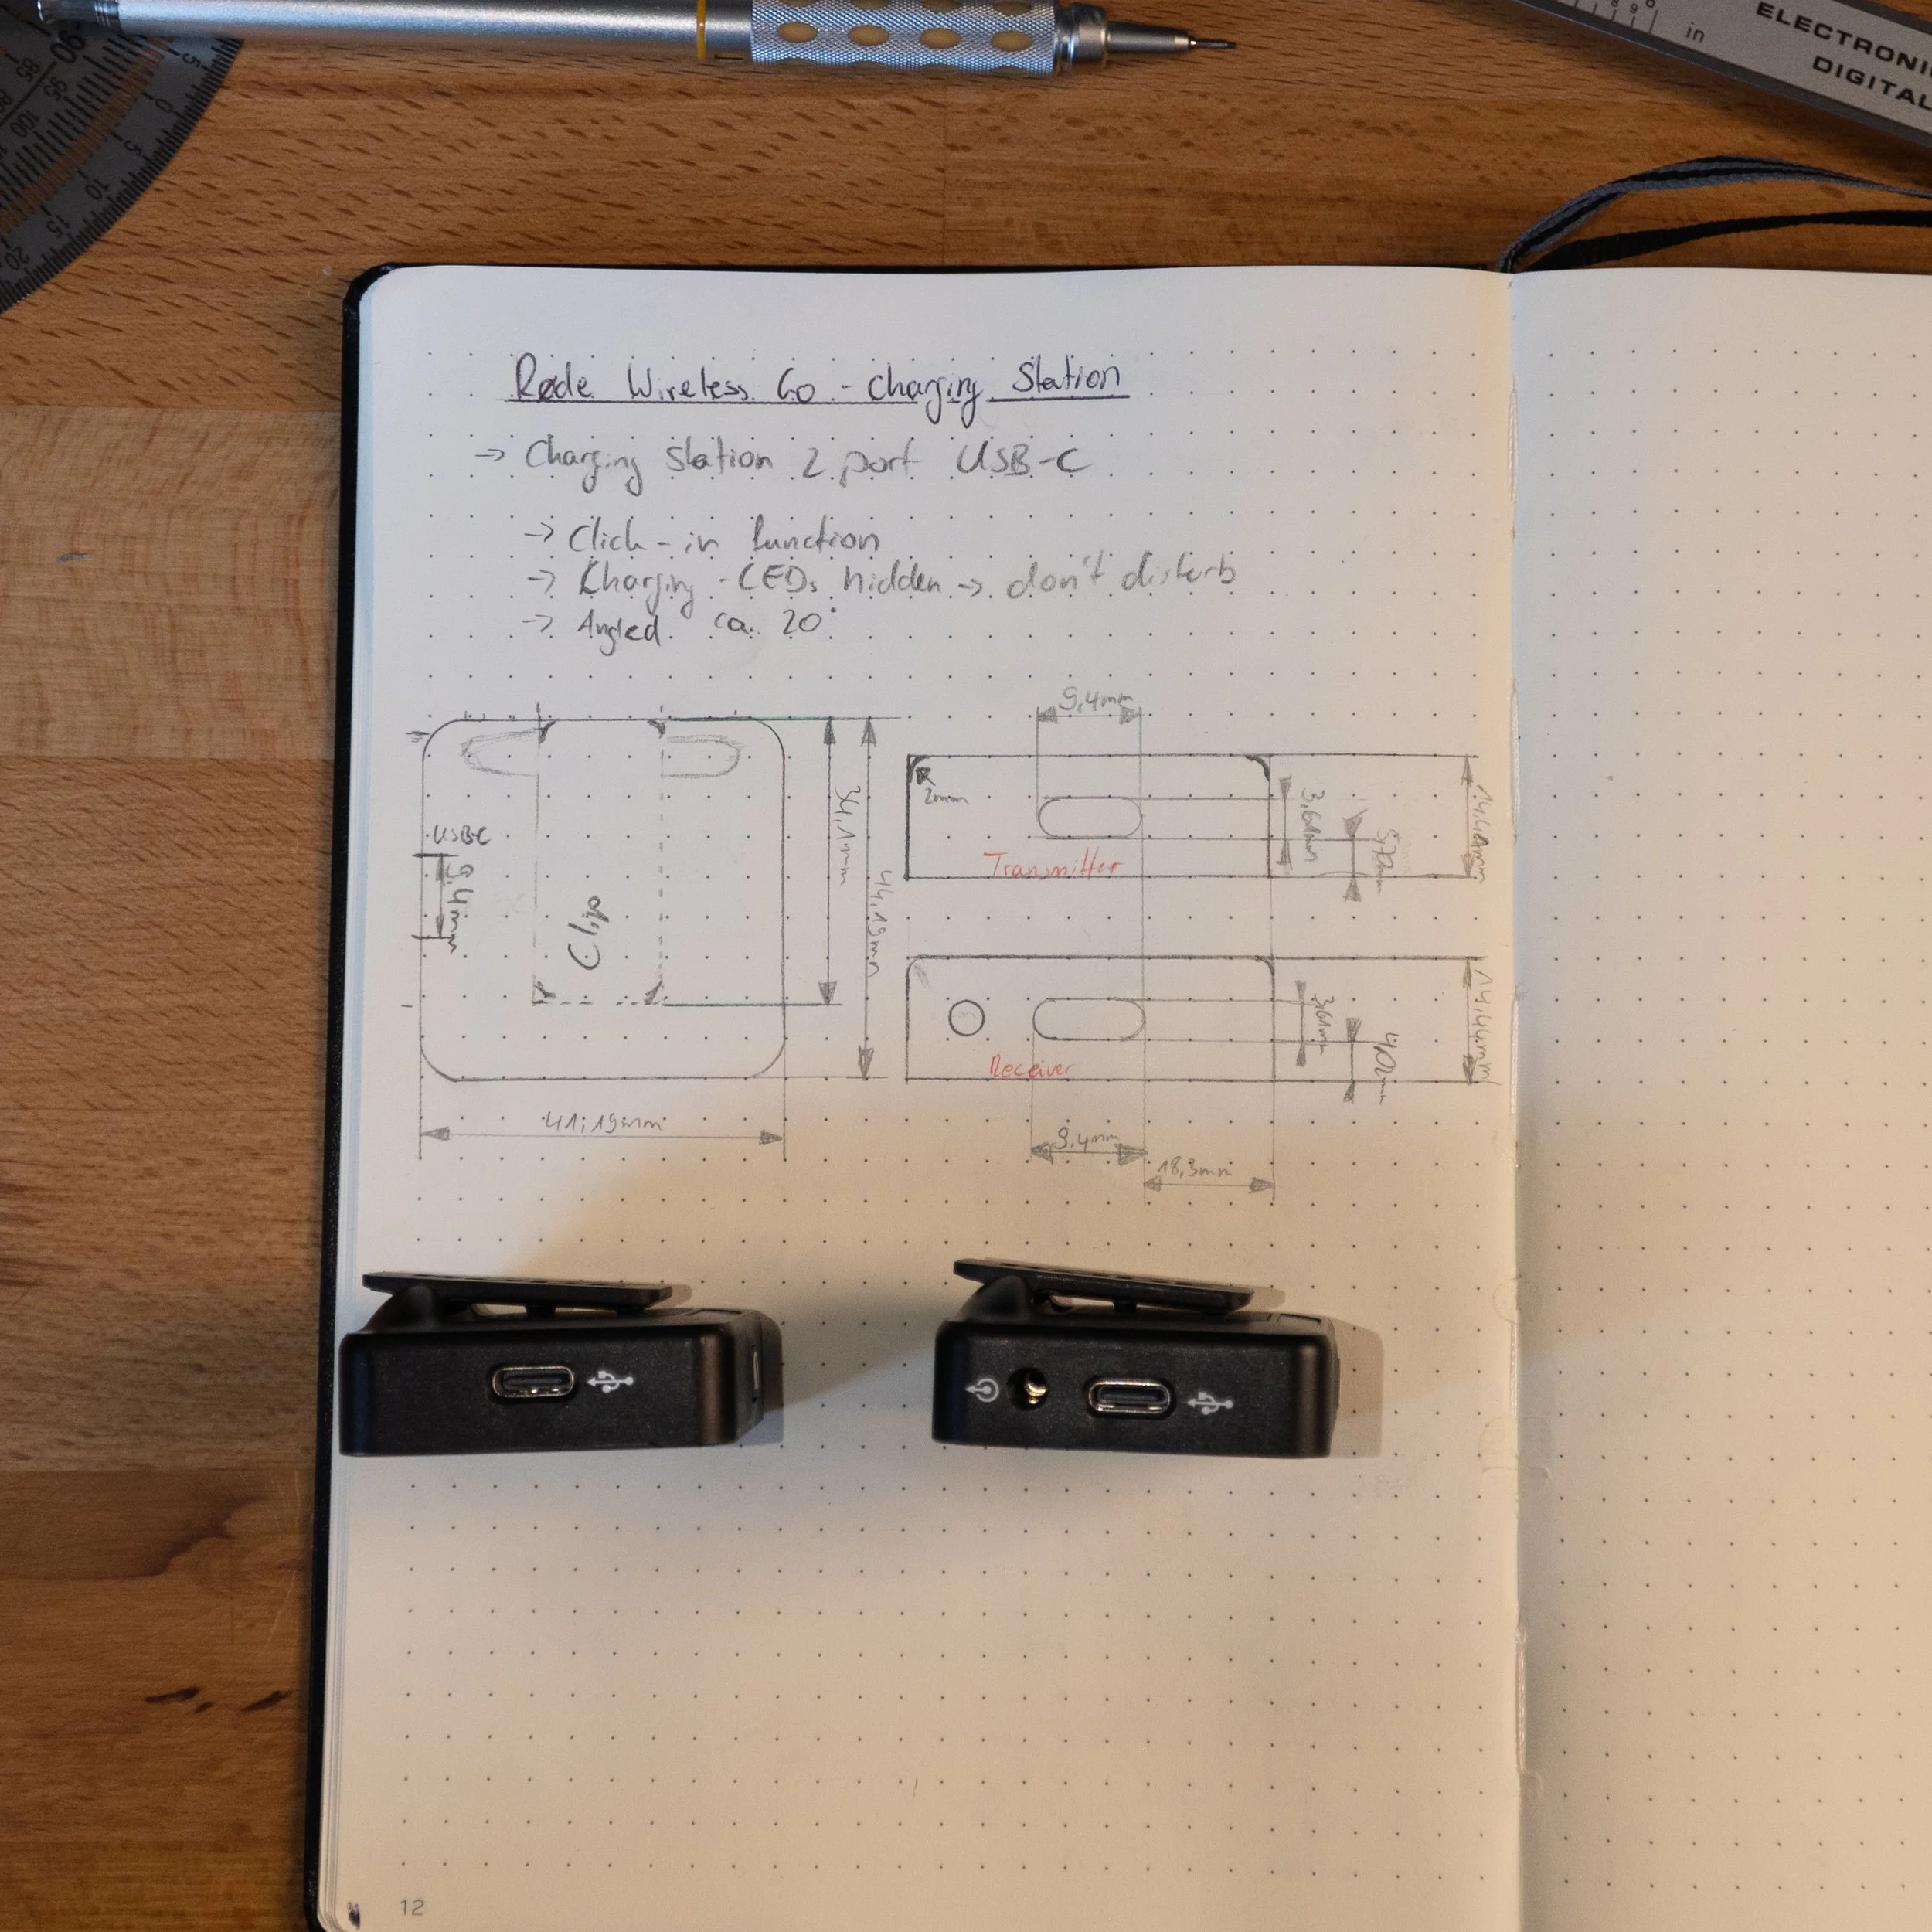
Firstly, I took out my caliper and carefully measured the dimensions of both the microphone (transmitter) and the receiver. As I was inspecting the two devices, I noticed that the position of the USB-C port was not identical on both, and as such, I had to take precise measurements to ensure that my design would fit both devices.
As I progressed, I decided that it would be possible to integrate a charging function into my design. Hence, I went ahead and measured the dimensions of two USB-C cables for a clamp slot in the final product. It was important to ensure that the charging ports on both the devices aligned perfectly with the charging ports on the cables to make charging convenient and effortless.
With all the necessary measurements taken, I began sketching out my design. I envisioned an angled charging station that would meet the specific requirements of both the microphone and the receiver. I focused on creating a design that would provide a comfortable usage, making it easier insert and eject both devices.
While sketching, I aimed to create a simple and clean design that would seamlessly integrate with the devices and blend well with any setting.
-
Materials:
Pencil, Caliper, Triangle Ruler, Sketchbook
Taking the measurements of the microphone (transmitter)…
… and the receiver as well.
Final sketch of my idea. Ready for the next step…
-
I first started building the prototype, by gathering some basic materials such as cardboard and duct tape. I wanted to create a rough prototype to get a sense of how the Transmitter and Receiver would fit together, and to determine the overall size and shape of the final product.
With the measurements and rough sketches and a CAD program, I made a 3D model of my first prototype. I had to divide the 3D body into two parts due to the functionality of a 3D printer so that the print layers are straight and thus the stablest.
To further improve the functionality of the prototype, I included two M3 screws and nuts to clamp the plugs of the cables in place. This would prevent the cables from becoming dislodged or damaged when the microphones were pulled out, ensuring that the product remained in good condition over time.
With my first cardboard prototype complete, I moved on to creating a second prototype using a 3D printer. The concept worked well, and I was pleased with the overall functionality of the prototype. However, I knew that there was room for improvement in terms of the design.
-
Materials:
Pencil, Caliper, Triangle Ruler, Scalpel, Duct Tape, Cardboard, Black PLA
Step 2 - Prototyping And Designing 3D-Models

Cardboard prototype


Wrapping the transmitter and receiver with cardboard.
Adding an angle to the main block.
3D-Rendering of the CAD-Model
First 3D-Printed prototype
-
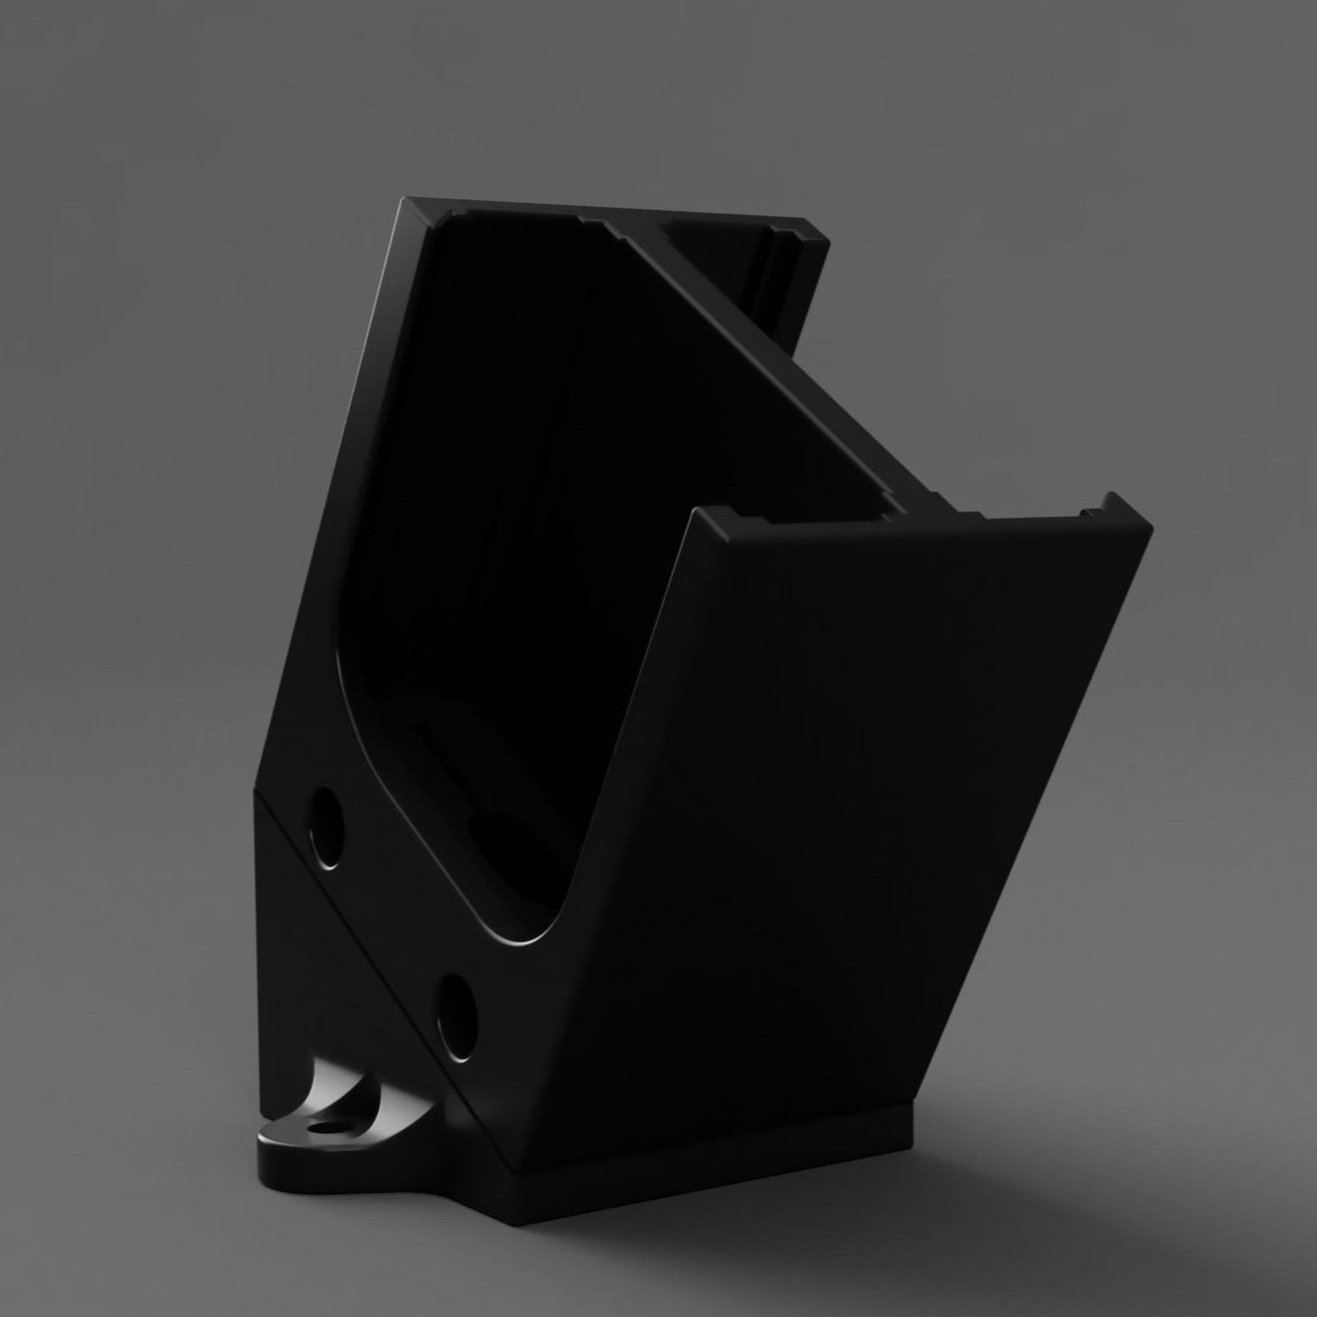
To make the final product more aesthetic and modern, I used some bevels and slight angles on the corners of the charger. I also made sure to prioritize functionality, ensuring that the microphones were easily accessible and that the cables remained firmly in place.
For the second prototype, I utilized a 3D printer to create a more refined design. One of the key advantages of using a 3D printer was the ability to quickly iterate the design. With each new iteration, I was able to refine the design, tweaking small details and making adjustments to improve functionality and aesthetics.
Throughout the process of designing and refining the prototype, I encountered a number of challenges. However, I learned a great deal about the importance of balancing form and function, and gained valuable experience in utilizing 3D printing technology. I am looking forward to continue refining the design and exploring new ways to improve it.
-
Materials:
USB-C cables, black PLA
Step 3 - Refining The Design
3D-Model of the charger
3D-Printed Charger
3D-Printed charger with the microphones charging
Assignment Two - Reboot

Original painting
“Kinder vorm Bauernhof”
- Paula Modersohn Becker
-
Impressed by the pristine landscape, Paula Becker moved to Worpswede in 1898 to continue her studies with her mentor Fritz Mackensen. It was there that she met her future husband, Otto Modersohn, whom she would marry in 1901. In the years after 1900, the landscape of Worpswede became her main subject. It was particularly the farm children, depicted individually or in groups, who she captured absorbed in themselves or playing with each other in an agricultural environment.
Without hesitation and open-hearted towards the encounter, Paula Modersohn-Becker portrayed the village children in front of a thatched barn building. -
I chose this painting because it reminds me of the simplicity and open-heartedness which I experienced during my visit in Worpswede. Resembling the timelessness of this magical place.
Elaboration 1 - Cinematic Trailer
-
DEATH IN BRUSHSTROKES
What came to my mind first was a cinematic representation of this painting. Due to the limited time and budget I used the video material I filmed in Worpswede past spring. In Worpswede I was amazed by the story of Paula Modersohn Becker. She was a pioneer of modern art who was often ridiculed due to her progressive thinking and idealism because her contemporaries did not understand her genius. What impresses me is that she did not achieve success during her lifetime but still believed in herself.
The topic of the cinematic representation is Paula Modersohn Becker’s early death.
Disclaimer Fiction Following!
The movie begins with the discovery of a long-lost Paula Modersohn Becker painting, “Kinder vorm Bauernhof” which has been missing for decades.
The painting was found in the possession of a wealthy art collector who claimed to have inherited it from his grandfather. The art collector invites a team of experts to authenticate the painting, and the team is led by a young art historian named Emily.
Emily is an expert in Paula Modersohn Becker’s work, and she quickly realizes that the painting may hold a clue to a mystery that has puzzled art historians for years. As she studies the painting, she discovers a hidden message that Paula Modersohn Becker had painted into the dark door of the barn - a message that could reveal the truth about the artist's sudden death.
Emily's investigation takes her on a journey through Paula Modersohn Becker’s life, from her early days as a art student in Paris to her final years in Worpswede. As Emily delves deeper into the painting's secrets, she becomes increasingly obsessed with the artist and her tragic story. She finds herself drawn to the beautiful landscape of the painting, and she begins to see the world through Paula Modersohn Becker’s eyes. But as Emily gets closer to the truth, she realizes that she may be in danger. Someone doesn't want her to uncover the mystery, and they will stop at nothing to keep her from discovering the truth. In a thrilling climax, Emily confronts her adversary and uncovers the truth about Paula Modersohn Becker’s death.
Emily's journey has led her to a deeper understanding of the power of art and the human spirit. The movie ends with Emily standing in front of the painting, lost in thoughts, as the kids in the foreground continue to move and play. -
I started with the intro, which should be exciting and mysterious. Additionally, I wanted to include the quote "Ich weiß, ich werde nicht sehr lange leben. Aber ist das denn traurig. Ist ein Fest schöner, weil es länger ist? Und mein Leben ist ein Fest, ein kurzes, intensives Fest" which she wrote in a diary around 1900. Therefore, I gathered materials that could correspond to 1900 and created a flatlay which I then filmed. To generate a suitable atmosphere, I used a small LED panel which I set to a flicker mode to simulate a candle. I placed a paper with tracking markers on the table and put a green paper with tracking markers in the picture frame. I then replaced these with the actual images in the editing program.
I then added a text layer on the footage and animated it in a typewriter look from left to right. And thus the intro was finished.
-
To create the video, I first added some music that I had downloaded from Epidemic Sounds. I used this as multi-track audio so that I could adjust the music's length to fit the video later. Next, I inserted the selected footage that I had recorded in Worpswede and cut it to the appropriate length, so as not to reveal too much of the story. Then, I applied basic color grading, which consisted of adjusting the white balance, contrast, color correction, and applying a LUT.
-
The most important aspect of creating the title animation was that it fits the story. I wanted to have some abstract brushstrokes in the background, from which the title would emerge. The strokes should be confusing and mixed up like a jumble. The title should be bold, so that it stands out to the viewer despite the confusion in the background. I enhanced this effect by adding a drop shadow behind the text.
The title "Death in Brushstrokes" refers to the mystery of Paula Modersohn Becker's death, which Emily finds in the thatched roof of the farmhouse that Paula painted.
Untracked footage with markers and “green screen” and tracked footage with final images

Timeline with the tracked second clip, no scaling and color correction applied to the footage.

Timeline with the tracked second clip, scaling and color correction applied to the footage.
Final Trailer

… applying color correction to match other footage
(White Balance, Contrast, Colorshift and Lut)

… scaling the Image

… adding a letterbox/black bars to match
aspect ratio of clips I shot in Worpswede

… adding titles to footage

Final timeline
Elaboration 2 - Movie Poster For The Trailer
-
To create a movie poster, I first tried to design a poster without any background information. But i didn’t like the outcome.
So I researched what elements are necessary for a good movie poster. I made sure to include the title, a question, the producer's name, and an image that gives a rough idea of the context of the movie without giving away too much information.I then searched for a picture of an old easel and found one that I liked. I replaced the old painting with the painting of Paula Modersohn Becker, making sure it was well-positioned and clear.
Since I was basically done with the background I added some white trim around the edges to ensure even spacing.
Next, I added the main title in a bold font and placed it in a prominent location. I inverted the colors so the that there is a higher contrast between these to. Because a brushstroke creates something and death is the end of something/someone.
I also created a sentence made up of spread-out titles that represent the search of the protagonists in the movie. The sentence is to make the viewer ask themselves a question about what could happen in the movie.Overall, I focused on creating a simple and visually striking movie poster that would grab the attention of potential viewers and give them a sense of what the movie is about.

Inserted the picture of an old easle

First Version was way to boring

… embedded the painting of Paula

… made sure to get the right perspective

… placed main title

… added white trim

… offset the subtitle

Final Movie Poster
Elaboration 3 - Virtual “Bauernhaus”
-
To create a 3D rendering of a farmhouse, I first researched the different options available for creating such a rendering. I was already familiar with Blender and Unreal Engine 5, but ultimately decided to use Unreal Engine 5 (UE5) as it would allow me to easily incorporate 3D models into the scene. I knew I wanted to create a rendering that showed the painting in front of the farmhouse, in the style of “…Und mein Leben ist ein Fest, ein kurzes, intensives Fest” ("…and my life is a celebration, a short, intense celebration.")
To achieve this, I researched the types of festive lighting that were available in the year 1900.
I began by creating a 3D world, starting with the ground where the farmhouse would be situated. I made the ground a mixture of earthy gravel and soil, which would be a good base for the grass that would come later. After creating some hills and valleys on the flat plane, I began work on the farmhouse itself. I designed it as a timber-framed house with a white painted exterior, which I created in Photoshop and then imported into UE5 as a texture.Once the farmhouse was complete, I added some props from the Quixel Megascans Library that were appropriate for the time period, placing them around the house in a realistic manner. I also added fairy lights, which had been invented in 1901. I had to adjust the lighting to make it look more realistic, and then added foliage to the ground consisting of cloves, grass, and some taller grass to create a sense of depth in the scene. I also added some birch trees, which were Paula Modersohn-Becker's favorite trees, to mask the horizon and make the 3D world appear endless.
Once I was satisfied with the 3D world, I added a virtual camera and used keyframes to animate the movement from a close-up of the painting to a wide shot of the entire scene. I then rendered the camera movement into individual frames and combined them in Davinci Resolve to create a final video with 30 frames per second. Overall, this process allowed me to create a stunning 3D rendering of the farmhouse that captured the spirit of the time period and the artist's work.

… build a 3D Model of the “Bauernhaus”

Made the gravel ground of the scenery

… relight the fairy lights

… added some props of Quixel Megascans
…qued up to the movie render pipeline
Final Rendering


… painted some foliage into the scenery
Elaboration 4 - Background Music
… recorded the acoustic rhythm guitar first
… to add some depth a melody
… and a lead to make it more melodic

The video recording setup, using black paper roll to block reflections on the guitar.
Final background music with playback video
-
I wanted to make a musical background of the paintings scenery. I aimed to convey the emotions that the painting evokes within me.
Firstly, I had a rough idea in my head that I didn't want to forget. So, I recorded it with my phone to make a quick sketch of the melody. Later, I used my studio equipment to record the song with better audio quality.
For this particular song, I wanted to use my acoustic guitar to create a nice, easy, relaxed and playful vibe that the painting expresses to me.
I started by recording the acoustic rhythm guitar to get the rhythm of the song. I made sure that the strokes of the guitar were soft and soothing. Then, I added a second acoustic guitar to add some melody and depth to the song. I imagined it being birds that are tweeting in the birch trees of the the farm. Finally, I added a lead guitar to give the song some character that would fit into the scenery of the painting.Once I had recorded all the guitar tracks, I used an equalizer and compressor to master the audio.
I then added some reverb to the lead guitar to make it more fluid and flowy.When I was happy with the audio, I decided to create a video to visualize the timeline of the song. I set up my video equipment, including a big softbox to create a nice light-falloff on the guitar.
Then, I recorded myself playing along the audio tracks. After recording, I combined the video and audio in Davinci Resolve and color corrected the video to make it look more professional. I also added some birds tweeting in the background, that I have recorded as a foley for a video, a long time. The reason it being that I sounds like that the song was recorded outside in front of the barn.
Elaboration 5 - Photo Manipulation
-
As my fifth project, I wanted to combine a modern photo with the art piece. Using Photoshop, I attempted to transfer Paula M.B.'s style onto photography. To do this, I utilized various filters such as Oil Painting and Abstract Brush Strokes. Additionally, I finalized the stylized photo by desaturating the colors, giving it a washed-out effect.
Next, I masked the children from the original painting and placed them over the stylized photo. To create a certain depth in the image, I placed a few leaves from the original photo's hedge over the children. After inserting the children into the stylized photo, I placed it over my original photo and masked out the parts that were designated to appear modern.
My intention was to have the children standing in front of the old house in modern Worpswede. Realizing how fast and narrow-minded modern society is…

Photo of a barn, I shot in Worpswede

tryed to adapt the style of Paula M.B to the Photo
Original painting

masked out the children from the original painting and added to stylized photo

Final modified photo

used the hedge from the photography as an overlay to create depht